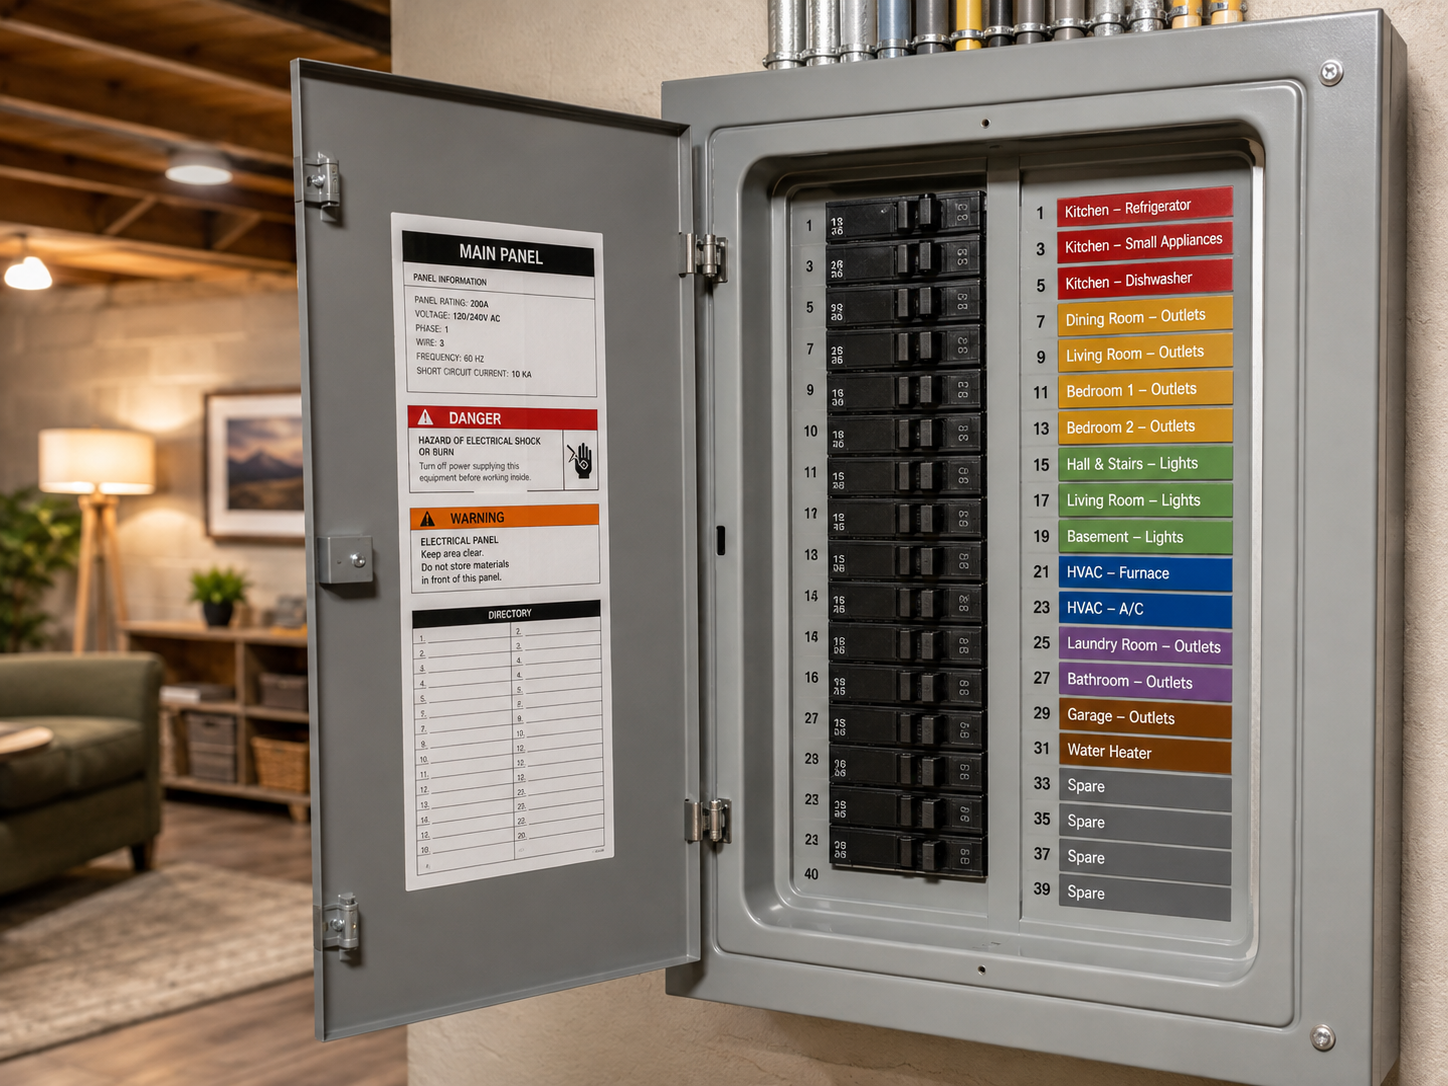
Every homeowner should know how to label an electrical panel correctly. A well-organized panel improves safety during emergencies and future repairs. According to the National Fire Protection Association (NFPA), 47% of electrical fires in U.S. homes involve wiring or overloaded circuits. Proper labeling reduces this risk by helping homeowners, electricians, and emergency responders identify and shut off the right circuits quickly. This guide covers how to understand your panel’s layout and create a clear, durable labeling system that meets OSHA and NFPA standards, even if you’re new to DIY electrical work.
At Home Circuitry HQ, we’ve helped thousands of homeowners complete electrical projects safely. Whether you’re upgrading your panel, troubleshooting a tripped breaker, or planning a kitchen remodel, knowing how to read and label your electrical panel is essential. This guide walks you through the process step by step, with real examples and tips to ensure your work is safe and code-compliant.
At a Glance:
- Labeling your electrical panel improves safety, reduces repair downtime, and meets electrical code requirements.
- You’ll need a multimeter, flashlight, circuit tester, and durable labeling materials like self-adhesive labels or a label maker.
- Start by turning off the main power and testing each circuit to confirm what it controls before labeling.
- Use clear, permanent labels and update them whenever you add or change circuits.
- Labeling isn’t a one-time task—maintain your system by reviewing labels annually or after any electrical work.
Understanding Your Home’s Electrical Panel: What Every DIY Homeowner Should Know
The electrical panel—often called the breaker box or fuse box—is the center of your home’s electrical system. It distributes power from your utility company to every outlet, light, and appliance. Most modern homes have a load center with circuit breakers, while older homes may still use fuses. According to the U.S. Energy Information Administration, 95% of new U.S. homes use circuit breaker panels because they’re safer and more convenient.
Your panel has two main sections: the main breaker (usually at the top) and individual circuit breakers. Each breaker controls a specific circuit in your home. For example, one breaker might power the kitchen outlets, while another controls the living room lights. The panel door often includes a directory label—a small list of breakers and their functions—but these are rarely detailed or up to date. That’s why learning how to label an electrical panel correctly matters for DIYers.
Before you start labeling, locate your panel and understand its components. Most panels are gray metal boxes, typically installed in a basement, garage, or utility closet. The door should open easily to reveal a grid of breakers. If your panel has a main breaker, it’s usually a large switch at the top or side that controls power to the entire panel. Below it, you’ll see rows of smaller breakers, each with a number (e.g., 15, 20, 30) indicating its amperage rating.
Pro Tip: If your panel is labeled with numbers like “1” or “2” instead of room names, the labeling is outdated. These numbers often correspond to the circuit’s position in the panel, not its function. Always verify what each circuit controls before relying on existing labels.
Not sure where your panel is located? Check common spots like:
- Garages or basements
- Utility closets
- Exterior walls (especially in warm climates)
- Under stairs or in laundry rooms
If you can’t find it, call a licensed electrician. Hiding panels behind drywall or in locked rooms violates NFPA 70 (National Electrical Code), which requires panels to be accessible.
Why Proper Electrical Panel Labeling Is Essential for Every Home
Labeling your electrical panel is a safety and efficiency practice, not just about organization. According to the U.S. Consumer Product Safety Commission, electrical malfunctions cause 13% of all home structure fires each year. Many of these fires could be prevented with clear labeling, which allows homeowners to shut off power to specific areas quickly during emergencies.
Here’s why every DIY homeowner should label their electrical panel:
- Safety During Emergencies: If a circuit trips or a fire occurs, knowing which breaker controls which area saves time. For example, if your kitchen outlet sparks, you’ll want to shut off the kitchen circuit immediately—not guess which breaker it is.
- Easier Troubleshooting: When a breaker trips frequently, you need to identify the affected circuit to diagnose the issue. Without labels, you might waste hours testing each breaker one by one.
- Code Compliance: The National Electrical Code (NEC) 408.4 requires circuit directories to be “legible and permanently installed.” While this doesn’t mandate detailed labels, it does require that the labeling system be clear and durable enough to last the life of the installation.
- Future Repairs and Upgrades: If you sell your home or hire an electrician for future work, detailed labels make their job easier. Electricians charge less for jobs where the panel is already organized, saving you money.
- Fire Prevention: Overloaded circuits are a leading cause of electrical fires. Proper labeling helps you identify and address overloaded circuits before they become hazards.
Real-World Example: A homeowner in Texas found that a 20-amp circuit powered both a refrigerator and several outlets—all on the same circuit. This overloaded setup caused nuisance tripping. After splitting the circuit, the homeowner reduced fire risk and improved energy efficiency. Without proper labeling, they never would have caught the issue.
In contrast, an unorganized panel can lead to dangerous situations. Imagine a family member trips a breaker in the middle of the night but can’t find the right switch. They might flip the main breaker, cutting power to the entire house. With clear labels, they could shut off only the affected circuit, keeping the rest of the home powered.
Common Labeling Mistakes to Avoid
While labeling seems straightforward, DIYers often make mistakes that reduce effectiveness. Avoid these pitfalls:
- Vague Labels: Labels like “Room 1” or “Breaker 1” are useless. Be specific—“Kitchen Outlets,” “Master Bedroom Lights,” etc.
- Temporary Labels: Pencil, sticky notes, or masking tape won’t last. Use permanent markers, laminated paper, or engraved plastic labels.
- Ignoring AFCI/GFCI Breakers: Arc-Fault Circuit Interrupter (AFCI) and Ground-Fault Circuit Interrupter (GFCI) breakers protect against fires and shocks. Label these clearly so you know which circuits require extra caution.
- Overloading Circuits: Labeling won’t fix an overloaded circuit. If you’re frequently tripping breakers, consult an electrician to redistribute the load.
- Skipping Verification: Always test each circuit to confirm what it powers before labeling. A breaker labeled “Dining Room” might actually control the garage lights.
Tools and Materials You’ll Need to Label Your Electrical Panel
Before you start, gather the right tools and materials to ensure your labeling project is safe and effective. Here’s a checklist:
| Tool/Material | Purpose | Recommended Options |
|---|---|---|
| Multimeter | Tests voltage to confirm circuits are safe to work on | Extech MT525 (budget-friendly) or Fluke 117 (professional-grade) |
| Non-contact voltage tester | Quickly checks if a circuit is live without touching wires | Klein Tools NCVT-2 |
| Flashlight or headlamp | Illuminates dark panels and tight spaces | Streamlight ProTac (rechargeable) |
| Circuit tester or outlet analyzer | Confirms what each outlet controls (e.g., kitchen vs. garage) | Klein Tools ET200 |
| Self-adhesive labels or label maker | Creates durable, permanent labels for the panel door | Brother PTD600 (label maker) or Avery Durable Plastic Labels |
| Permanent marker or engraving tool | For writing directly on labels or the panel door | Sharpie Permanent Markers or Dremel Engraving Tool |
| Screwdriver | Removes the panel door for labeling | TEKTON 20048 |
| Zip ties and wire labels | Organizes and labels wires behind the panel (optional but recommended) | Brady Self-Laminating Wire Labels |
You don’t need professional-grade tools for this project, but investing in a quality multimeter and voltage tester is worth it for safety. Brands like Fluke and Klein Tools are trusted by electricians for their reliability. If you’re on a tight budget, a basic multimeter (under $30) will work for most DIY needs.
Safety Note: Never use a multimeter or voltage tester on a live circuit unless you’re trained to do so. Always turn off the main breaker before working on the panel.
Step-by-Step: How to Label an Electrical Panel Safely (For Beginners)
Labeling your electrical panel can feel intimidating, but breaking it down into steps makes it manageable. Follow this process to label your panel safely and accurately:
Step 1: Turn Off the Main Power and Prepare Your Workspace
Safety first! Before touching the panel, turn off the main breaker to cut power to the entire box. This is usually a large switch at the top or side of the panel. Flip it to the “Off” position. Use your non-contact voltage tester to confirm the panel is dead. Test the tester on a known live outlet first to ensure it’s working.
Clear your workspace and gather your tools. Place a flashlight or headlamp nearby to illuminate the panel. If your panel is in a tight space, consider laying down a drop cloth to keep the area clean.
Step 2: Remove the Panel Door and Inspect the Breakers
Use a screwdriver to remove the screws holding the panel door in place. Set the screws aside in a safe spot. Carefully lift the door off and prop it against a wall or lay it flat on a table. Take a moment to inspect the breakers. Look for any signs of damage, such as scorch marks, rust, or loose connections.
Check the amperage rating of each breaker. Common ratings include 15 amps (for lights and outlets), 20 amps (for kitchen appliances and power tools), and 30 amps (for dryers or water heaters). Never replace a breaker with one of a higher amperage—this is a fire hazard.
Step 3: Test Each Circuit to Identify What It Powers
This is the most time-consuming step, but it’s crucial for accurate labeling. Start by turning the main breaker back on. Then, systematically test each circuit to see what it controls. Here’s how:
- Turn on all lights and appliances: Flip on every light switch in your home and plug in appliances like lamps, refrigerators, and microwaves.
- Trip breakers one at a time: Go to your panel and turn off one breaker at a time. Listen for appliances that turn off or lights that go dark. For example, if you turn off a breaker and the kitchen lights go out, you’ve identified that circuit.
- Use an outlet analyzer: Plug an outlet analyzer into each outlet to see which circuit it’s on. This tool will tell you the outlet’s voltage and which breaker controls it. Models like the Klein Tools ET200 can test multiple outlets at once.
- Label as you go: Keep a notepad or spreadsheet handy to jot down what each breaker controls. For example:
- Breaker 1: Kitchen Outlets
- Breaker 2: Living Room Lights
- Breaker 3: Garage Lights
If you’re working alone, enlist a helper to stand near the outlets and report what turns off when you flip a breaker. This saves time and reduces frustration.
Pro Tip: Label breakers in pencil first. Once you’ve confirmed what each one controls, use a permanent marker or label maker to create the final label.
Step 4: Create Clear, Durable Labels for Each Breaker
Now that you know what each breaker controls, it’s time to create labels. Your labels should be:
- Specific: Instead of “Bedroom,” use “Master Bedroom Ceiling Fan” or “Guest Room Outlets.”
- Permanent: Avoid paper or sticky notes. Use plastic, metal, or laminated paper.
- Self-adhesive labels: Avery Durable Plastic Labels are a budget-friendly option. They’re waterproof and can be written on with a permanent marker.
- Label makers: Brother and Dymo label makers create professional-looking labels that are easy to read. The Brother PTD600 is a great choice for electrical panels.
- Engraved labels: For a high-end look, use a Dremel engraving tool to etch labels directly into a metal plate. This option is pricier but extremely durable.
- Consistent: Use the same format for all labels. For example:
- Room Name (e.g., “Kitchen”)
- Specific Device or Area (e.g., “Refrigerator,” “Microwave,” “Outlets Only”)
- Amperage Rating (e.g., “20A”)
- Special Features (e.g., “GFCI Protected,” “AFCI Protected”)
- Legible: Use large, bold fonts. Avoid cursive or tiny handwriting.
Attach the labels to the panel door, either directly on the metal or on a plastic sheet that’s screwed to the door. If your panel has a clear plastic cover, you can write directly on it with a dry-erase marker for temporary labels.
Step 5: Add a Directory to the Panel Door
A directory is a summary of your panel’s labeling system. It’s usually placed on the inside of the panel door and lists each breaker’s location, function, and amperage. Here’s an example:
PANEL DIRECTORY

Main Breaker: 200A

1. Kitchen Outlets - 20A (GFCI)
2. Kitchen Lights - 15A
3. Living Room Outlets - 20A
4. Living Room Lights - 15A
5. Master Bedroom Outlets - 20A (AFCI)
6. Master Bedroom Lights - 15A
7. Garage Lights - 15A
8. Garage Outlets - 20A
9. Bathroom Outlets - 20A (GFCI)
10. Bathroom Lights - 15A
Include the main breaker’s amperage at the top of the directory. This helps electricians quickly understand the panel’s capacity.
Step 6: Organize and Label Wires Behind the Panel (Optional but Recommended)
While the panel door is off, take the opportunity to organize the wires behind it. Use zip ties to bundle loose wires and label them with wire markers. This step isn’t required by code, but it makes future maintenance easier. If you ever need to add a new circuit, you’ll be able to trace the wires quickly.
Label wires using a standard system like:
- Black = Hot (240V)
- Red = Hot (120V)
- White = Neutral
- Green or Bare = Ground
Use wire labels like the Brady BP29 series, which are heat-resistant and easy to read.
Step 7: Reinstall the Panel Door and Test Your Labels
Once all labels are in place, carefully reinstall the panel door. Screw it back into place and ensure it’s secure. Turn the main breaker back on and test a few circuits to confirm your labels are accurate. For example, flip the breaker labeled “Kitchen Outlets” and plug in a lamp. If the lamp turns off, your label is correct.
If a label is wrong, don’t panic. Turn off the main breaker, correct the label, and retest. It’s better to fix mistakes now than during an emergency.
Final Tip: Take a photo of your labeled panel and store it in a safe place (e.g., a home maintenance binder or digital cloud storage). This way, you’ll have a backup reference if the labels ever get damaged.
Best Practices for Circuit Breaker Labeling: What the Experts Recommend
Following expert-recommended best practices ensures your labeling system is effective and safe. Here’s what electricians and safety organizations suggest:
Use Standardized Terminology
Consistency is key when labeling your panel. Use the same terms for rooms and devices across all labels. For example:
Do Use:
- “Kitchen Outlets” instead of “Kitchen Plugs”
- “Living Room Lights” instead of “LR Lights”
- “Bathroom GFCI Outlets” instead of “Bath Outlets”
Avoid:
- Abbreviations (unless they’re universally understood, like “HVAC”)
- Vague terms like “Room 1” or “Area A”
- Humorous or informal labels (e.g., “Man Cave Lights”)
Standardized terminology ensures that anyone—family members, electricians, or emergency responders—can understand your labels without confusion.
Highlight Special Features
Some circuits have special features that are critical to know. Highlight these on your labels:
- GFCI Protected: These circuits prevent electrical shocks. They’re common in kitchens, bathrooms, and outdoor outlets. Label them clearly so you know which circuits require extra caution.
Example: “Bathroom GFCI Outlets – 20A (GFCI)”
- AFCI Protected: Arc-Fault Circuit Interrupters prevent fires caused by electrical arcs. They’re often required in bedrooms and living rooms. Label them to remind you to check for arc faults if the breaker trips frequently.
Example: “Bedroom Outlets – 15A (AFCI)”
- Dedicated Circuits: Some appliances (like refrigerators or microwaves) require their own circuit. Label these as “Dedicated” to avoid overloading them.
Example: “Refrigerator – 20A (Dedicated)”
Include Amperage Ratings
Always include the amperage rating of each breaker on your labels. This helps prevent overloading. For example, if you’re adding a new appliance to a circuit, you’ll know whether the breaker can handle the extra load.
Format amperage ratings clearly:
- 15A = Lights, small appliances
- 20A = Kitchen outlets, power tools
- 30A = Dryers, water heaters
Update Labels After Any Electrical Work
Labeling isn’t a one-time task. Every time you add a new circuit, upgrade an appliance, or rearrange your home’s layout, update your panel labels. For example:
- If you install a new ceiling fan in the bedroom, update the “Bedroom Lights” label to include “Ceiling Fan.”
- If you replace a 15-amp breaker with a 20-amp breaker for a new workshop, update the label to reflect the change.
Set a reminder to review your panel labels annually. This ensures they stay accurate and up to date.
Use Color Coding (Optional)
Some homeowners use color coding to make labels even clearer. For example:
- Red: High-voltage circuits (e.g., 240V appliances like dryers)
- Blue: GFCI-protected circuits
- Green: AFCI-protected circuits
- Black: Standard 120V circuits
Color coding is optional but can be helpful for quick identification. If you use color coding, include a key on the panel door so others understand the system.
Store Backup Information
In addition to labeling the panel, store backup information in a safe place. This could include:
- A photo of the labeled panel
- A list of all circuits and their functions
- Wiring diagrams or schematics (if available)
Keep this information in your home maintenance binder or a digital folder. If your labels get damaged or the panel needs servicing, you’ll have a reference to work from.
How to Label an Electrical Panel for Different Home Layouts
Every home is unique, and the best labeling system depends on your home’s layout and electrical needs. Here’s how to adapt this guide for different scenarios:
For Small Apartments or Studios
In a small space, your electrical panel likely has fewer breakers, but labeling is still critical. Use a simple, straightforward system:
- Label each breaker by its primary function (e.g., “Kitchen,” “Bathroom,” “Living Room”).
- Include the amperage rating on each label.
- If a breaker controls multiple areas (e.g., living room and bedroom lights), note both on the label (e.g., “Living Room & Bedroom Lights – 15A”).
Small apartments often share circuits between rooms, so test thoroughly to avoid mislabeling.
For Large Homes with Multiple Floors
Large homes require more detailed labeling. Organize your labels by floor and room:
- Ground Floor: Kitchen, Living Room, Dining Room, Garage
- Second Floor: Master Bedroom, Guest Room, Bathroom
- Basement: Laundry Room, Workshop, Storage
Include sub-labels for specific devices. For example:
- Ground Floor
- Kitchen – 20A
- Refrigerator (Dedicated)
- Microwave
- Countertop Outlets
- Living Room – 20A
- Entertainment System
- Lamps
- Kitchen – 20A
For multi-story homes, consider creating a master directory that lists all breakers by floor and room. Store this directory near the panel for quick reference.
For Homes with Outbuildings (Garage, Workshop, Shed)
Outbuildings often have their own circuits, which can complicate labeling. Use a system that clearly distinguishes between the main house and outbuildings:
- Main House
- Kitchen – 20A
- Bedroom Lights – 15A
- Garage
- Garage Lights – 15A
- Garage Outlets – 20A
- Workshop Dedicated Circuit – 30A
Include the outbuilding’s name on each label to avoid confusion. For example, label a garage outlet circuit as “Garage Outlets – 20A” instead of just “Outlets.”
For Homes with Smart or Specialty Circuits
Smart homes and specialty circuits (like those for home theaters or EV chargers) require extra attention. Label these clearly to avoid accidental shutoffs:
- Smart Home
- Home Automation Panel – 20A
- Wi-Fi Router – 15A
- Home Theater
- Projector & Screen – 20A (Dedicated)
- Surround Sound System – 15A
- EV Charger
- Electric Vehicle Charger – 50A (Dedicated)
For specialty circuits, include the device name and any special instructions (e.g., “Do Not Turn Off Without Unplugging EV Charger”).
Troubleshooting Common Electrical Panel Labeling Issues
Even with careful planning, you might encounter issues while labeling your panel. Here’s how to troubleshoot the most common problems:
Issue 1: Breakers Control More Than One Area
It’s common for a single breaker to power multiple rooms or devices, especially in older homes. For example, a breaker might control the kitchen outlets and the garage lights. In this case, label the breaker with both functions:
Example: “Kitchen Outlets & Garage Lights – 20A”
If the breaker controls too many areas, consider splitting it into separate circuits. This is a job for a licensed electrician, but it’s worth addressing if the circuit is frequently overloaded.
Issue 2: Two Breakers Control the Same Circuit
This is called a multi-wire branch circuit and is common in kitchens and bathrooms where 240V appliances (like dryers) share a neutral wire. If you find two breakers controlling the same area, label them as a pair:
Example: “Kitchen Outlets – 20A (Pair with Breaker 6)”
Never turn off only one breaker in a multi-wire branch circuit—it can create a dangerous situation. Always turn off both breakers simultaneously.
Issue 3: Breakers Are Labeled Incorrectly
If you discover that existing labels are wrong, don’t rely on them. Test each breaker to confirm its function and update the labels accordingly. This is especially important if you’re troubleshooting an electrical issue.
For example, if a breaker labeled “Living Room Lights” actually controls the basement, relabel it as “Basement Lights – 15A.”
Issue 4: The Panel Is Overcrowded or Hard to Access
If your panel is overcrowded or installed in a tight space, consider upgrading to a larger panel or relocating it to a more accessible area. This is a job for a licensed electrician, but it’s worth addressing if the panel is difficult to work with.
Signs your panel needs an upgrade include:
- Frequent tripping of breakers
- Burn marks or scorch odors
- Rust or corrosion
- Limited space for new circuits
If you’re experiencing any of these issues, check out our guide on Signs Your Home Wiring Needs an Upgrade for more details.
Issue 5: You Can’t Identify a Breaker’s Function
If you test a breaker and can’t determine what it controls, don’t guess. Leave it unlabeled or mark it as “Unknown” and investigate further. You can:
- Check your home’s original electrical plans (if available).
- Hire an electrician to trace the circuit.
- Plug a circuit tracer into the outlet and follow the signal to the panel.
Never assume a breaker’s function—mislabeling can lead to dangerous situations.
Electrical Panel Maintenance and Labeling: Keeping Your System Up to Date
Labeling your electrical panel is just the first step. To keep your system safe and functional, maintain both the panel and its labels over time. Here’s how to ensure your labeling system stays accurate and your panel remains in good condition:
Schedule Annual Label Reviews
Set a reminder to review your panel labels every year. This ensures they stay accurate, especially if you’ve made changes to your home’s electrical system. During your review:
- Test each circuit to confirm its label is correct.
- Update labels for any new devices or rooms.
- Check for damaged or faded labels and replace them as needed.
Annual reviews are also a good time to inspect the panel itself for signs of wear or damage.
Inspect the Panel for Damage
While reviewing your labels, take a moment to inspect the panel for any issues. Look for:
- Rust or corrosion: This can indicate moisture issues and may require sealing or replacement.
- Burn marks or scorch odors: These are signs of overheating or arcing and require immediate attention.
- Loose connections: Check that all wires are securely connected to the breakers and bus bars.
- Tripped breakers: If a breaker trips frequently, it may be overloaded or defective.
If you notice any of these issues, consult a licensed electrician before proceeding with any work.
Maintain a Home Electrical Log
Keep a log of all electrical work done in your home, including:
- New circuit installations
- Breaker upgrades or replacements
- Outlet or switch repairs
- Panel inspections or upgrades
This log will help you track changes to your electrical system and ensure your panel labels stay up to date. Store the log in your home maintenance binder or a digital folder.
Upgrade Labels as Needed
Over time, labels can fade, peel, or become damaged. Keep spare labels on hand so you can replace them as needed. If you’re using a label maker, save your template so you can reprint labels easily.
For panels in high-traffic areas, consider using engraved metal labels. These are more durable and resistant to wear and tear.
Educate Family Members
Your labeling system is only useful if others know how to use it. Take the time to educate family members about:
- How to turn off the main breaker in an emergency.
- How to read and interpret the panel labels.
- What to do if a breaker trips frequently.
This is especially important for households with children or elderly residents. Consider posting a simple guide near the panel for quick reference.
Plan for Future Upgrades
If you’re planning to add new circuits or upgrade your electrical system, factor labeling into your plans. For example:
- If you’re installing a new workshop, plan for a dedicated circuit and label it clearly.
- If you’re upgrading to a smart panel, research how to integrate smart labeling systems.
- If you’re adding an EV charger, label the dedicated circuit prominently.
By planning ahead, you’ll ensure your labeling system grows with your home’s electrical needs.
When to Call a Professional: Signs Your Electrical Panel Needs Expert Attention
While labeling your electrical panel is a DIY-friendly task, some situations require a licensed electrician. Knowing when to call a professional can prevent safety hazards and costly repairs. Here are the signs it’s time to bring in an expert:
Frequent Breaker Trips
If breakers trip frequently, it’s a sign of an overloaded or faulty circuit. While some tripping is normal (e.g., during a power surge), frequent trips indicate a deeper issue. An electrician can redistribute the load or upgrade your panel to handle the demand.
According to the U.S. Environmental Protection Agency, overloaded circuits are a leading cause of electrical fires. Don’t ignore frequent trips—address them promptly.
Burn Marks or Scorch Odors Near the Panel
Burn marks, scorch odors, or melted plastic near the panel are signs of overheating or arcing. These issues require immediate attention, as they can lead to fires. Turn off the main power and call an electrician right away.
Rust or Corrosion on the Panel or Wires
Rust or corrosion indicates moisture issues, which can damage the panel and create safety hazards. If you notice rust, check for leaks or high humidity in the area. An electrician can assess the damage and recommend repairs or replacements.
Buzzing or Crackling Noises from the Panel
Unusual noises like buzzing or crackling are signs of loose connections or arcing. These issues can cause fires or damage your appliances. Turn off the main power and call an electrician immediately.
Flickering Lights or Dimming Appliances
Flickering lights or dimming appliances can indicate voltage fluctuations or overloaded circuits. While some flickering is normal during high-demand periods, persistent issues require investigation. An electrician can diagnose the problem and recommend solutions.
Outdated or Non-Functional Panel
If your panel uses fuses instead of breakers, it’s outdated and may not meet modern safety standards. Fuse panels are more prone to overheating and fires. If your home still has a fuse panel, consider upgrading to a circuit breaker panel.
Other signs your panel is outdated include:
- Limited space for new circuits
- Breakers that won’t reset or stay tripped
- Panel age (most panels last 20–30 years)
If your panel is more than 20 years old, consult an electrician to assess whether it needs upgrading.
DIY Labeling Isn’t Enough
If you’re struggling to identify what each breaker controls or your panel is overly complex, it’s okay to call a professional. Electricians have tools like circuit tracers and thermal imagers to diagnose issues quickly. They can also help you create a comprehensive labeling system tailored to your home’s needs.
For more guidance on when to call an electrician, check out our article on Signs Your Home Wiring Needs an Upgrade.
FAQs About Electrical Panel Labeling for DIY Homeowners
Is it really necessary to label my electrical panel?
Yes! Labeling your electrical panel is a safety and efficiency best practice. According to the National Fire Protection Association, clear labeling helps prevent electrical fires and reduces the risk of accidents during repairs. It also saves time and money when troubleshooting or hiring an electrician.
What’s the best way to test what a breaker controls?
The most reliable method is to use a circuit tester or outlet analyzer. Plug the tester into an outlet and flip breakers one at a time to see which one controls the outlet. Alternatively, turn off all lights and appliances, then flip one breaker at a time to see what turns off. Enlist a helper to make this process faster and easier.
Can I use a smartphone app to label my panel?
While smartphone apps can help organize your labeling system, they’re not a substitute for physical labels on the panel. Apps like Schneider Electric’s Wiser Energy or Samsung SmartThings can create digital directories, but they require power to function. Always have physical labels as a backup.
How often should I update my panel labels?
Review your labels annually and update them whenever you make changes to your electrical system. This includes adding new circuits, upgrading appliances, or renovating rooms. Set a reminder in your calendar to ensure you don’t forget.
What should I do if I can’t identify what a breaker controls?
If you test a breaker and can’t determine its function, don’t guess. Leave it unlabeled or mark it as “Unknown” and investigate further. You can check your home’s original electrical plans, hire an electrician, or use a circuit tracer tool. Never assume a breaker’s function—mislabeling can lead to dangerous situations.
Are there any legal requirements for electrical panel labeling?
The National Electrical Code (NEC) 408.4 requires that circuit directories be “legible and permanently installed.” While this doesn’t mandate detailed labels, it does require that the labeling system be clear and durable. Always follow local codes and regulations, as some municipalities may have additional requirements.
Can I label my panel with a pencil if I’m not sure?
No. Pencil marks can smudge or fade over time, making them unreliable. Use a permanent marker, label maker, or engraved label to ensure your labels last. If you’re testing circuits, use a notepad to jot down your findings and transfer them to permanent labels once you’re sure.
What’s the best material for electrical panel labels?
The best materials are durable and heat-resistant. Options include:
- Self-adhesive plastic labels: Avery Durable Plastic Labels are waterproof and easy to write on.
- Label makers: Brother and Dymo label makers create professional-looking, long-lasting labels.
- Engraved metal labels: These are the most durable but require a Dremel engraving tool.
Avoid paper or sticky notes, as they won’t hold up over time.
How do I label a GFCI or AFCI breaker?
Always highlight GFCI and AFCI breakers on your labels. Use the abbreviations “GFCI” or “AFCI” next to the circuit’s function. For example:
- “Bathroom GFCI Outlets – 20A (GFCI)”
- “Bedroom Outlets – 15A (AFCI)”
This reminds you and others that these circuits have special safety features.
Is it safe to label my panel while the power is on?
No! Always turn off the main power before working on the panel. Working on a live panel is extremely dangerous and can result in electrocution or fire. Use a non-contact voltage tester to confirm the panel is dead before touching any wires or breakers.
What should I do if my panel is in a locked room?
Panels must be accessible at all times. If your panel is in a locked room, install a lock that can be easily opened in an emergency (e.g., a breakable glass panel or a lockbox with a key kept nearby). Never install a panel in a space that requires a key to access during an emergency.