Your home’s electrical system runs behind the walls, but when wiring becomes outdated or overloaded, problems can appear—flickering lights, warm outlets, or even fire hazards. The U.S. Fire Administration reports that electrical failures cause nearly 30,000 home fires each year, many of which could be prevented with timely upgrades. Recognizing the signs your home wiring needs an upgrade is about safety and protecting your investment.
Why Upgrading Old Home Wiring Matters
According to the National Fire Protection Association (NFPA), 51% of home electrical fires involve wiring or related equipment. Older homes, especially those built before the 1980s, often have electrical systems that can’t handle today’s power demands. These systems were designed for fewer appliances and lower energy use, but modern homes run multiple devices, smart systems, and high-wattage appliances that stress aging circuits.
For DIY homeowners, knowing when to upgrade your home’s electrical system means recognizing outdated wiring problems. Frequent circuit breaker trips or warm outlets signal it’s time to take action. Ignoring them could lead to costly repairs—or worse.
This guide explains the key signs your home wiring needs an upgrade, the warning signs of residential wiring safety hazards, and a practical old house rewiring checklist. Whether you live in an older home or just want to ensure your electrical system is up to code, this article will help you make safe decisions.
At a Glance
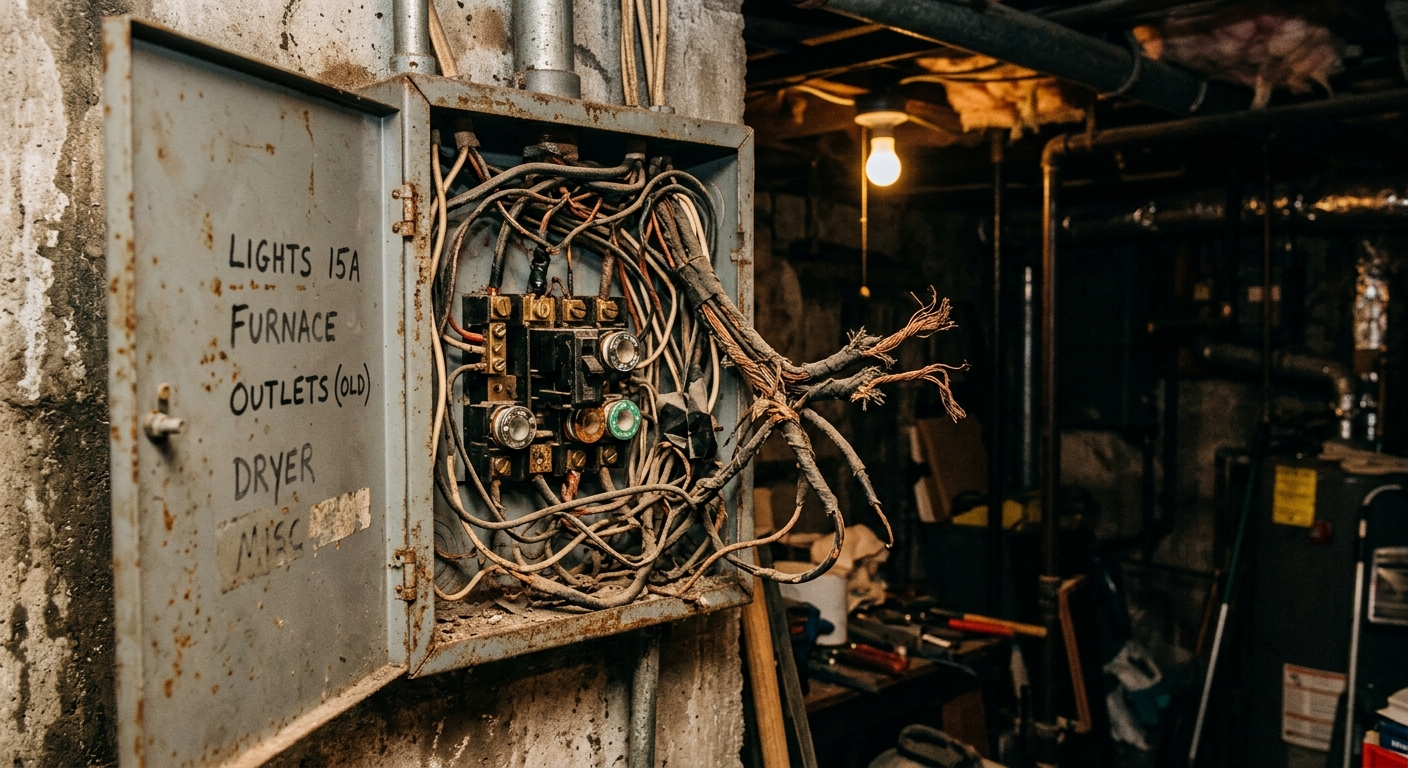
Key warning signs: Frequent breaker trips, flickering lights, warm outlets, burning smells, outdated wiring types (knob-and-tube, aluminum), and a panel that’s overcrowded or outdated (e.g., Federal Pacific or Zinsco).
DIY tip: Always turn off power at the breaker before inspecting any wiring. If you’re unsure, consult a licensed electrician—especially for major upgrades.
Top 10 Signs Your Home Wiring Needs an Upgrade
Your home’s electrical system shows when it’s struggling—sometimes subtly, sometimes obviously. These are the most common outdated electrical wiring problems that signal a need for an upgrade:
1. Circuit Breaker Trips Are a Daily Occurrence
If your circuit breaker trips more than once a month, it’s a warning. Circuit breakers protect your home by cutting power when circuits are overloaded. Frequent tripping means your system is straining, especially if you’re using multiple high-wattage appliances at once (think space heaters, microwaves, or power tools).
According to the Electrical Safety Foundation International (ESFI), overloaded circuits account for 33% of electrical fires in homes. If you find yourself constantly resetting breakers, your electrical panel may be outdated or undersized for your needs. Modern homes typically require a 200-amp service, while older homes often have only 60- or 100-amp panels—far below today’s standards.
2. Lights Flicker or Dim When Using Appliances
Flickering lights aren’t just annoying—they’re often a symptom of residential wiring safety hazards. When you turn on a high-wattage appliance like a vacuum or hairdryer, and your lights dim or flicker, your wiring is struggling to distribute power evenly. This could be due to loose connections, undersized wires, or an outdated panel.
The U.S. Consumer Product Safety Commission (CPSC) reports that loose or corroded wiring connections are a leading cause of electrical fires. If flickering happens consistently, investigate further. Check if the issue occurs in specific outlets or rooms to pinpoint the problem area.
3. Outlets or Switches Are Warm to the Touch
Warm or hot outlets and switches are a serious red flag. While some warmth is normal for heavy-duty appliances, persistent heat suggests dangerous resistance in the wiring. This resistance creates heat that can degrade insulation and increase fire risk.
In a study by the NFPA, 30% of electrical fires started with a heat-related issue in wiring or connections. If you notice warmth when touching an outlet plate or switch after use, unplug any devices immediately and avoid using that outlet until it’s inspected. This is one of the most urgent signs your home wiring needs an upgrade.
4. You Smell Burning or a Strange Odor Near Outlets or Panels
A persistent burning smell near outlets, panels, or wiring is never normal. This odor often indicates overheating wires, melting insulation, or a failing electrical component. If you detect a burning scent, turn off the power to that area immediately and investigate the source.
According to the U.S. Fire Administration, electrical malfunctions are the second leading cause of home fires, often starting with a small, smoldering issue that escalates. Never ignore this sign—address it as a potential fire hazard. If the smell persists after turning off the power, contact an electrician immediately.
5. Your Home Has Knob-and-Tube or Aluminum Wiring
Homes built before the 1950s often used knob-and-tube wiring, which lacks a ground wire and is insulated with cloth or rubber that degrades over time. This type of wiring is a major fire hazard, especially in older homes with renovations that may have damaged the original insulation.
Aluminum wiring, which was used in some homes from the 1960s to mid-1970s, is another concern. Aluminum expands and contracts more than copper, leading to loose connections that can overheat. The CPSC estimates that homes with aluminum wiring are 55 times more likely to have fire hazards compared to homes with copper wiring. If your home has either of these wiring types, an upgrade is essential for safety.
6. Your Electrical Panel Is Overcrowded or Outdated
An electrical panel, or breaker box, is the brain of your home’s electrical system. If yours has a mix of breakers from different brands, is missing a main breaker, or has Federal Pacific or Zinsco panels, it’s time for an upgrade. These brands are known for malfunctioning breakers that fail to trip when they should, increasing fire risk.
The National Electrical Code (NEC) recommends panels with clear labeling, adequate space for future expansion, and breakers that meet current safety standards. If your panel is rusty, corroded, or has wires connected with tape or other makeshift fixes, it’s a sign of neglect. A licensed electrician can assess whether your panel needs replacement or an upgrade to at least 200 amps.
7. You’re Constantly Using Extension Cords or Power Strips
Relying on extension cords or power strips as a permanent solution is dangerous. Extension cords are designed for temporary use, not as a substitute for proper wiring. Overloading them with multiple high-wattage devices can cause overheating and fire hazards.
The ESFI reports that one in three electrical fires involves extension cords or power strips. If you find yourself plugging in multiple appliances into a single outlet or using extension cords frequently, your home lacks sufficient outlets. Adding more outlets or upgrading your wiring is a safer, long-term solution.
Learn more about safe power strip use here.
8. Your Home Is Over 40 Years Old and Has Never Been Rewired
If your home is over 40 years old and has never undergone a full rewiring, it’s likely using outdated components that don’t meet modern safety standards. Electrical codes have evolved significantly since the mid-20th century, with updates focused on reducing fire and shock hazards. Older homes may lack ground fault circuit interrupter (GFCI) outlets in kitchens, bathrooms, and outdoor areas, where water exposure is common.
The NEC requires GFCI protection in these high-risk areas to prevent electrocution. If your home lacks these features, it’s a sign your electrical system is due for an upgrade. A full rewiring ensures your home meets current safety codes and can handle modern power demands.
9. You Notice Sparks When Plugging In or Unplugging Devices
Sparks are never a good sign. If you see sparks when plugging in or unplugging a device, it indicates a poor connection, which can generate heat and pose a fire risk. While a small spark occasionally might not seem urgent, consistent sparking is a clear indication of a problem with the outlet, wiring, or device.
The CPSC warns that sparks and arcing are a leading cause of electrical fires. If this happens, stop using the outlet immediately and inspect it for damage. If the issue persists, consult an electrician to replace the outlet or repair the wiring.
10. Your Home Has Two-Prong Outlets (No Ground Wire)
Two-prong outlets, which lack a ground wire, are a relic of older electrical systems. These outlets cannot safely handle modern appliances and devices, increasing the risk of electric shock. The NEC has required grounded outlets (three-prong) in most areas since the 1960s.
If your home still has two-prong outlets, upgrading to three-prong outlets with proper grounding is essential. This not only improves safety but also allows you to use modern appliances without risking damage to your devices or home.
Old House Rewiring Checklist: What to Look For
Older homes often hide electrical issues behind walls and ceilings. Use this old house rewiring checklist to assess whether your home needs a full rewiring:
Step 1: Inspect Your Electrical Panel
- Age: Panels from the 1960s–1980s (e.g., Federal Pacific, Zinsco) are known fire hazards and should be replaced.
- Capacity: A 100-amp panel is too small for modern homes. Upgrade to 200 amps if you own appliances like central AC, electric stoves, or EV chargers.
- Labeling: Panels should have clear, accurate labeling. If breakers are unlabeled or incorrect, it’s a sign of neglect.
Step 2: Check Wiring Types
- Knob-and-tube wiring: Identified by ceramic knobs and tubes running through walls. This wiring lacks a ground wire and insulation that degrades over time.
- Aluminum wiring: Common in homes built between 1965–1975. Look for silver-colored wires and markings like “ALUM” or “ALCAN.”
- BX cable: Armored cable with a metal jacket. While better than knob-and-tube, it’s not ideal for modern needs.
If your home has any of these wiring types, a full rewiring is often the safest option.
Step 3: Test Outlets and Switches
- Use an outlet tester: Plug it into each outlet to check for proper wiring, open grounds, reversed polarity, or open neutrals.
- Look for discoloration: Burn marks, melted plastic, or a burning smell near outlets indicate serious issues.
- Test GFCI outlets: Press the “Test” button on GFCI outlets in kitchens, bathrooms, and outdoor areas. If they don’t trip or reset, they may be faulty.
Step 4: Assess Load Capacity
- Calculate your electrical load: Add up the wattage of all appliances and devices. If your total exceeds 80% of your panel’s capacity, you need an upgrade.
- Check for overloaded circuits: Use a clamp meter to measure current on circuits. If a circuit consistently draws more than 80% of its rated amperage, it’s overloaded.
Step 5: Look for DIY Fixes or Tape-Ins
- Tape-ins: Wires wrapped in electrical tape instead of proper connectors are a fire hazard.
- Romex without staples: Loose Romex (NM cable) wiring can sag or get damaged over time.
- Improper junction boxes: Any wiring not enclosed in a junction box is a safety hazard.
Step 6: Check for Proper Grounding
- Test outlets: Use a multimeter to check for grounding. A properly grounded outlet should read ~120V between hot and neutral, and ~0V between neutral and ground.
- Look for two-prong outlets: If your home has them, upgrade to three-prong outlets with grounding.
Step 7: Assess Lighting and Appliance Circuits
- Dedicated circuits: High-wattage appliances (e.g., refrigerators, microwaves, washing machines) should have dedicated circuits to prevent overloads.
- Lighting circuits: Older homes often have lighting and outlets on the same circuit. Separate them for better safety and efficiency.
When to Upgrade Your Home Electrical System: Red Flags vs. False Alarms
Not every electrical issue requires a full system upgrade. Some problems can be fixed with targeted repairs or upgrades. Here’s how to distinguish between when to upgrade your home electrical system and when a simpler solution will suffice:
Red Flags: Upgrades Are Non-Negotiable
| Issue | Why It’s Serious | DIY Fix? |
|---|---|---|
| Knob-and-tube wiring | Lacks ground wire, insulation degrades over time, high fire risk | No—requires full rewiring |
| Aluminum wiring | Expands/contracts, leading to loose connections and overheating | No—requires expert remediation (e.g., pigtailing) |
| Federal Pacific/Zinsco panels | Known for malfunctioning breakers that fail to trip | No—requires panel replacement |
| Frequent breaker trips (daily) | Indicates constant overloading and potential fire risk | No—requires load calculation and panel upgrade |
| Burning smells or warm outlets | Sign of overheating wires or failing connections | No—requires immediate inspection and repair |
False Alarms: Repairs May Suffice
| Issue | Why It’s Manageable | DIY Fix? |
|---|---|---|
| Single flickering light | Often caused by a loose bulb or faulty fixture | Yes—check bulb, tighten fixture, or replace switch |
| Occasional breaker trip | May be due to temporary overload (e.g., space heater) | Yes—reduce load or redistribute appliances |
| Dead outlet in one room | Could be a tripped breaker, loose wire, or faulty outlet | Yes—check breaker, test outlet, or replace outlet |
| GFCI outlet that won’t reset | Often caused by moisture or a tripped circuit | Yes—test GFCI, reset, or replace if faulty |
How to Plan a Safe and Effective Home Wiring Upgrade
Upgrading your home’s wiring is a major project, but with the right planning, you can minimize disruptions and ensure safety. Here’s a step-by-step guide to help you plan your upgrade:
Step 1: Consult a Licensed Electrician
A licensed electrician can:
- Assess your current system and identify hazards.
- Help you understand local electrical codes and permit requirements.
- Provide a detailed quote and timeline for the project.
In many states, homeowners can perform their own electrical work, but major upgrades (e.g., rewiring, panel replacements) typically require a permit and inspection. Check with your local building department for requirements.
Step 2: Choose the Right Panel and Wiring
Modern electrical systems require:
- 200-amp service: The standard for most homes today.
- Copper wiring: Preferred for its durability and conductivity (though aluminum is acceptable with proper connectors).
- Grounded outlets: Three-prong outlets in all living areas, with GFCI protection in kitchens, bathrooms, and outdoor spaces.
Your electrician can recommend the best panel type (e.g., main lug vs. main breaker) and wiring gauge based on your home’s load requirements.
Step 3: Create a Wiring Plan
A well-planned wiring system ensures efficiency and future-proofing. Consider:
- Dedicated circuits: For high-wattage appliances (e.g., refrigerator, oven, HVAC).
- Separate lighting and outlet circuits: Prevents overloads when you use multiple devices.
- Structured wiring: Plan for future smart home needs, including Ethernet, coaxial, and low-voltage wiring.
Step 4: Prepare Your Home for the Upgrade
Rewiring is messy and invasive. Before the project starts:
- Clear the area: Remove furniture, wall hangings, and obstacles from work zones.
- Protect valuables: Cover electronics and delicate items with drop cloths or plastic sheets.
- Plan for temporary power: Your electrician may need to disconnect power for extended periods. Arrange alternative power sources if needed.
- Communicate with your electrician: Discuss timelines, access to your home, and any specific concerns.
Step 5: Inspect and Test After Completion
Once the upgrade is complete, your electrician should:
- Perform a final inspection: Ensure all wiring meets code and the system is safe.
- Test all circuits: Verify that outlets, switches, and appliances receive proper power.
- Check for grounding and GFCI protection: Ensure all safety features are functional.
- Provide a certification: Some insurance companies require proof of electrical upgrades for coverage.
Common Mistakes to Avoid During a Wiring Upgrade
Even experienced DIYers can make costly mistakes during a wiring upgrade. Avoid these pitfalls to ensure your project is safe and successful:
1. Skipping Permits and Inspections
Permits and inspections are not optional—they’re critical for safety and legal compliance. Skipping them can void your homeowner’s insurance and create liability issues if a fire or accident occurs. Always check with your local building department before starting work.
2. Using the Wrong Wire Gauge
Wire gauge (thickness) determines how much current a wire can safely carry. Using a wire that’s too thin for your circuit’s load can cause overheating and fire hazards. For example:
- 14-gauge wire: Suitable for 15-amp circuits (e.g., lighting, general outlets).
- 12-gauge wire: Required for 20-amp circuits (e.g., kitchen outlets, power tools).
- 10-gauge wire: Needed for 30-amp circuits (e.g., dryers, water heaters).
Your electrician can help you choose the right gauge for each circuit.
3. Overloading Circuits
Even with new wiring, overloading circuits can cause tripping and fire hazards. Follow these guidelines:
- Rule of thumb: Never exceed 80% of a circuit’s rated amperage. For a 20-amp circuit, aim for a maximum load of 16 amps.
- Use dedicated circuits: High-wattage appliances should have their own circuits to prevent overloads.
- Check appliance labels: Appliances like refrigerators, microwaves, and power tools have wattage ratings. Add these up to ensure they fit within your circuit’s capacity.
4. Ignoring Grounding Requirements
Grounding is essential for safety, as it provides a path for excess electricity to safely dissipate. Never skip grounding or use two-prong outlets in place of three-prong outlets unless you’re using a ground fault circuit interrupter (GFCI).
5. Failing to Label the Panel
A well-labeled panel makes future maintenance and troubleshooting easier. Take the time to label each breaker clearly, including the area of the home or circuit it controls. This is especially important if you ever sell your home or need to call an electrician.
6. Using Cheap or Improper Materials
Electrical components like outlets, switches, and breakers should meet safety standards. Avoid using no-name or off-brand products, as they may not be rated for your system’s voltage or amperage. Stick to reputable brands like Leviton, Eaton, or Square D.
7. Not Planning for Future Needs
A wiring upgrade is an opportunity to future-proof your home. Plan for:
- Smart home technology: Include low-voltage wiring for security systems, thermostats, and entertainment systems.
- Renewable energy: If you’re considering solar panels or EV chargers, ensure your panel has space for additional circuits.
- Home office or workshop needs: Dedicate circuits for high-wattage equipment like 3D printers or power tools.
DIY vs. Professional Upgrades: What You Can—and Can’t—Do
As a DIY homeowner, you might be tempted to tackle your entire wiring upgrade yourself. While some tasks are within reach for experienced DIYers, others require professional expertise. Here’s what you can safely do—and when to call in an expert:
DIY-Friendly Tasks
These projects are manageable for DIYers with electrical experience and proper safety precautions:
- Replacing outlets and switches: Ensure you turn off the power at the breaker and test for live wires before proceeding.
- Installing new light fixtures: Follow the fixture’s wiring diagram and ensure proper grounding.
- Adding a dedicated circuit: If your panel has space, you can run new wiring for a specific appliance (e.g., a garbage disposal).
- Upgrading to GFCI outlets: Replace two-prong outlets with GFCI outlets in kitchens, bathrooms, and outdoor areas.
Tasks Best Left to Professionals
These projects involve high voltage, complex wiring, or legal requirements that make them unsuitable for DIYers:
- Rewiring an entire home: This involves extensive demolition, new wiring runs, and panel upgrades—best left to licensed electricians.
- Upgrading the electrical panel: Replacing a panel requires working with live wires and must meet code requirements.
- Fixing aluminum wiring: Aluminum wiring requires special connectors (e.g., COPALUM) to prevent fire hazards.
- Adding new circuits: Running new circuits from the panel to outlets or fixtures often requires permits and inspections.
Safety First: When to Call a Pro
If you’re unsure about any aspect of your wiring upgrade, err on the side of caution and consult a professional. Signs you need an electrician include:
- Unsure how to safely disconnect power.
- Your panel is outdated or overcrowded.
- You smell burning or see sparks.
- Wiring is damaged or improperly installed.
- You’re adding high-wattage appliances (e.g., EV chargers, central AC).
How Much Does a Wiring Upgrade Cost?
The cost of upgrading your home’s wiring varies widely based on your home’s size, age, and complexity of the project. Here’s a breakdown of what to expect:
Cost Factors
- Home size: Larger homes require more wiring and longer labor times.
- Small home (1,000–1,500 sq ft): $3,000–$6,000
- Medium home (1,500–2,500 sq ft): $6,000–$12,000
- Large home (2,500+ sq ft): $12,000–$25,000+
- Panel upgrade: Replacing a 100-amp panel with a 200-amp panel costs $1,500–$4,000, including labor.
- Wiring type: Copper wiring is more expensive than aluminum, but safer. Costs range from $2–$5 per foot for copper and $1–$3 per foot for aluminum.
- Drywall repair: If walls are opened for rewiring, expect $1,000–$3,000 for drywall repair and painting.
- Permits and inspections: Permits typically cost $100–$500, depending on your location.
Cost-Saving Tips
- Phase the project: Upgrade wiring room by room or circuit by circuit to spread out costs.
- DIY what you can: Handle simple tasks like replacing outlets or switches to reduce labor costs.
- Get multiple quotes: Compare estimates from at least three licensed electricians.
- Check for rebates: Some utility companies offer rebates for upgrading to energy-efficient systems.
ROI and Insurance Benefits
A wiring upgrade can increase your home’s value and lower insurance premiums. Many insurers offer discounts for homes with updated electrical systems, as they’re less likely to experience fires or other hazards. According to HomeAdvisor, a wiring upgrade can recoup 50–75% of its cost at resale, depending on the market.
Signs Your Home Wiring Needs an Upgrade: FAQs
Q: Can I upgrade my home’s wiring myself?
A: While some tasks (e.g., replacing outlets or switches) are DIY-friendly, major upgrades like rewiring or panel replacements should be handled by licensed electricians. Always check local codes and permit requirements before starting any project.
Q: How often should I upgrade my home’s wiring?
A: Most homes with original wiring should consider an upgrade after 40–50 years, especially if they show signs of wear or struggle to meet modern power demands. If your home has knob-and-tube or aluminum wiring, an upgrade is essential for safety.
Q: What’s the difference between a fuse box and a circuit breaker panel?
A: Fuse boxes use fuses that melt to break the circuit when overloaded, while circuit breaker panels use switches that trip to cut power. Circuit breakers are safer and easier to reset, but fuse boxes are a major red flag for outdated wiring.
Q: How do I know if my wiring is aluminum or copper?
A: Aluminum wiring is silver-colored and often marked with “ALUM” or “ALCAN.” Copper wiring is reddish-brown and flexible. If you’re unsure, consult an electrician for a professional assessment.
Q: Are GFCI outlets required in older homes?
A: While GFCI outlets weren’t required in older homes, they’re now mandatory in kitchens, bathrooms, laundry rooms, basements, garages, and outdoor areas. Upgrading to GFCI outlets in these spaces significantly reduces the risk of electric shock.
Q: How can I tell if my electrical panel is overloaded?
A: Signs of an overloaded panel include frequent breaker trips, warm or rusty breakers, and a panel that’s full with no room for new circuits. If your panel is more than 20 years old, it may not be able to handle modern power demands.
Q: What should I do if I suspect my home has knob-and-tube wiring?
A: If your home was built before the 1950s, it may have knob-and-tube wiring. This wiring lacks a ground wire and is insulated with materials that degrade over time. If you suspect it’s present, consult an electrician for an assessment and potential rewiring.
Q: Can I upgrade my wiring to support an EV charger?
A: Yes, but it requires a dedicated 240-volt circuit, often with a load calculation to ensure your panel can handle the additional load. Most homes will need a panel upgrade to accommodate an EV charger.
Prioritize Safety and Efficiency
Recognizing the signs your home wiring needs an upgrade is the first step toward a safer, more efficient home. From frequent breaker trips to warm outlets and outdated wiring types, these red flags should never be ignored. While some DIY tasks are manageable, major upgrades like rewiring or panel replacements require professional expertise to ensure safety and compliance with local codes.
If your home is over 40 years old, has knob-and-tube or aluminum wiring, or struggles to keep up with modern power demands, it’s time to take action. Start with a thorough inspection, consult a licensed electrician, and plan your upgrade carefully. The investment in a modern, code-compliant electrical system will pay off in safety, energy efficiency, and peace of mind.
For DIY homeowners, focus on learning safe practices and tackling smaller projects like outlet replacements or GFCI installations. Save the big jobs for the pros—electrical work is not the place to cut corners. By prioritizing your home’s electrical health, you’re protecting your family, your property, and your future.
Key Takeaways
- Frequent breaker trips, flickering lights, and warm outlets are clear signs your home wiring needs an upgrade.
- Knob-and-tube and aluminum wiring are major fire hazards that require professional attention.
- A 200-amp panel and grounded three-prong outlets are modern standards every home should meet.
- Always consult a licensed electrician for major upgrades to ensure safety and code compliance.
- Upgrading your wiring can lower insurance premiums and increase your home’s resale value.