Creating a cozy home is all about the right lighting. A 3 way switch gives you more control over your lights. It’s great for adjusting the mood in any room or hallway.
In this guide, we’ll show you why a 3 way switch is a game-changer. We’ll also share tips for installing it right in your home.
Key Takeaways
- A 3 way switch allows control of lighting from two different locations.
- Using multiple switches enhances convenience in your home.
- Proper wiring is essential for safe and effective operation.
- Choosing the right materials can ease installation and ensure compliance with electrical standards.
- Regular maintenance can prolong the lifespan of your switches.
- Innovative products from Legrand can simplify your 3 way switch needs.
Understanding the 3 Way Switch
A 3 way switch is key for better lighting control in homes. It lets you control a light from two spots. This is great for places like stairways or big rooms where one switch won’t do.
We’ll look at what a 3 way switch is and how it works in different situations.
What is a 3 Way Switch?
A 3 way switch lets you control a light from two places. This is different from 2-way switches, which only work from one spot. It’s perfect for homes with many entrances.
It uses a special setup with two traveler wires and one common wire. This setup lets electricity flow in different ways, making it great for complex wiring.
How Does It Work?
The 3 way switch works with two traveler wires and one common wire. This setup lets you control lights from different spots. It’s more than just a simple switch.
It has two switches for one light, making it flexible and useful. 4-way switches work the same way but for more locations. But, 3 way switches are more common.
It’s important to check and maintain 3 way switches often. They can wear out and not work well. Smart switches like Shelly and others can make controlling lights easier with apps.
| Switch Type | Control Locations | Common Usage Scenarios |
|---|---|---|
| 2 Way Switch | 1 | Single rooms, simple lighting setups |
| 3 Way Switch | 2 | Staircases, large rooms, dual entrances |
| 4 Way Switch | 3 or more | Long hallways, conference rooms |
Benefits of Using a 3 Way Switch
Using a 3-way switch in your home lighting system has many advantages. It lets you control one light from two spots, making your home more user-friendly. This feature adds convenience, making your life easier.
Convenience of Multiple Controls
3-way switches are great because they let you control lights from different places. This is super helpful in big rooms, staircases, and long hallways. It makes it safer and easier to get around.
- Flexible placement enhances control and usability.
- Improves safety in high-traffic areas.
- Allows for strategic lighting adjustments based on activity.
Enhanced Lighting Options
These switches offer many home lighting options. They work with smart home systems and dimmers. This lets you use advanced tech to manage your power better and add style to your home. Modern 3-way switches can do things like:
- Remote control through smartphone apps.
- Dimming for the perfect light level.
- Tracking energy use to cut down on costs.
Getting 3-way switches is more than just making things easier. It also makes your home more efficient and beautiful. By controlling your lights better, you save energy, stay safe, and have a nicer home.
| Benefit | Description |
|---|---|
| Multiple Controls | Control lighting from different locations for convenience and safety. |
| Energy Savings | Reduce energy consumption through better light management. |
| Smart Features | Integration with home automation systems for added control. |
| Aesthetic Options | Stylish designs that blend with modern home decor. |
3 Way Switch Wiring Basics
Learning about 3 way switch wiring is key for DIY fans and electricians. You need the right tools and materials for a safe, efficient job. Getting ready well can help you succeed.
Necessary Tools and Materials
Choosing the right tools and materials is crucial for your project. You’ll need:
- 4-in-1 screwdriver
- Non-contact voltage tester
- Utility knife
- Wire strippers
For wiring, you’ll use:
- 14-2 nonmetallic-sheathed cable
- 14-3 nonmetallic-sheathed cable (best for new homes)
- Copper pigtails
- Electrical tape
Types of Wiring Needed
In modern homes, a three-conductor Romex cable is common for 3-way switches. This setup is typical in new homes across the U.S. It supports both power and neutral lines, making wiring easier.
“Dumb” 3-way switches have a standard wiring, making installation simpler everywhere. Remember, the wiring can change if the load and line are in the same box or not.
Each wiring project gets a score out of 20. Points are for correct switch placement, wiring, and safety. With 180 points possible in nine projects, it’s a thorough learning experience.
Step-by-Step Guide to 3 Way Switch Installation
Installing a 3-way switch lets you control a light from two spots. It’s important to have a good wiring plan and follow safety tips. Getting ready well helps avoid problems.
Planning Your Wiring Layout
First, map out your wiring plan. Know where your light and switches are. 3-way switches have three terminals and a grounding screw. You’ll need tools like a screwdriver and wire connectors.
Installing the 3 Way Switch: A Practical Approach
Here are some tips for a smooth installation:
- Turn off power at the circuit breaker and use a voltage tester to confirm it is off.
- Carefully test the existing switch to ensure safety.
- Disconnect the wires from the old switch, taking note of their connections.
- Connect the wires to the new 3-way switches, ensuring that you correctly identify the common and traveler wires, which are often colored black, red, and white.
- Secure all connections and use electrical tape to ensure safety.
- Test the new switches to confirm functionality.
Getting the wire connections right is key. Don’t mix up the common wire or leave connections loose. Always test before finishing to make sure it works.

| Step | Description |
|---|---|
| 1 | Turn off the power at the circuit breaker. |
| 2 | Test existing switches for safety with a voltage tester. |
| 3 | Disconnect old switch wires while noting their connections. |
| 4 | Connect new switches, identifying common and traveler wires. |
| 5 | Secure connections and use electrical tape for safety. |
| 6 | Test final setup for proper function. |
3 Way Switch Wiring Diagram Explained
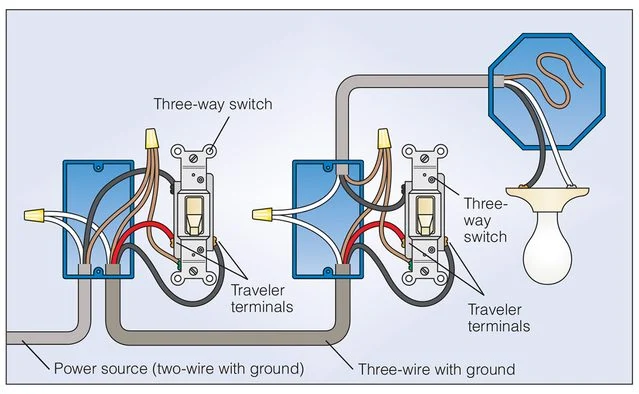
Learning about a 3 way switch wiring diagram can really help with your electrical projects. This diagram has four terminal screws with different jobs. There are two traveler terminals, a ground terminal, and a common terminal. Knowing what each does helps you understand electrical schematics better.
Setting up a 3 way switch can vary by manufacturer. So, it’s key to grasp wiring diagrams for a smooth installation. The traveler wires, usually red and black, connect multiple switches to one light. This is handy in modern homes, like at stairs or room entrances.
Each switch uses a single pole double throw mechanism. This connects the common terminal to either traveler terminal. When both switches are connected, the light turns on. The different wiring setups, like using 14-3 or 12-3 cables, show the need to know common electrical practices.
Remember, safety is crucial with 3 way switch wiring. Make sure there’s a ground wire. Always check wire connections with a voltmeter or voltage tester. For more complex setups, adding four-way switches can offer more control, making your space even more functional.
How to Wire a 3 Way Switch
Installing a 3-way switch might seem hard, but it’s doable with the right steps. Knowing how to wire a 3 way switch means understanding the wiring setup and paying close attention to details. By identifying the existing wiring and connecting the electrical wires correctly, you’ll make your lighting system safer and more functional.
Identifying Your Wiring Configuration
The first step is to figure out your wiring setup. Most homes have one light fixture controlled from two spots. It’s key to know the wires connected to your switches, like common, traveler, and ground wires. Knowing these helps avoid mistakes that could cause problems or safety risks.
Connecting the Wires Correctly
After understanding your wiring, it’s time to wire it up right. The 3-way switch doesn’t have labels for ON or OFF, making it tricky. Here’s how to install it safely:
- First, turn off the power at the circuit breaker to stay safe while wiring.
- Find the common terminal on the switches. This is where the power or light fixture connects.
- Link the traveler wires to the traveler terminals on each switch, keeping colors consistent.
- Connect the ground wire to the green screw on the switch.
- Make sure all connections are tight with wire nuts and electrical tape to avoid short circuits.
By following these steps, you’ll wire it right. Learning the right techniques not only keeps you safe but also makes your home more energy-efficient. If you’re unsure about any part, getting a qualified electrician might be the best choice.
| Wire Color | Function |
|---|---|
| Black | Hot Wire (Common) |
| Red | Traveler Wire |
| White | Neutral (if present) |
| Green | Ground Wire |
Using a 3 Way Dimmer Switch
A 3 way dimmer switch lets homeowners adjust light levels from different spots. This makes spaces like living rooms and dining areas more cozy and useful. It’s a smart way to control lighting.
Benefits of Dimmer Switches
Dimmer switches do more than just turn lights on and off. They offer many benefits, including:
- Energy Savings: Dimming lights can cut down on energy use.
- Customized Ambiance: Change the lighting to match any mood or event.
- Extended Bulb Life: Dimmers help bulbs last longer by reducing heat.
- Flexibility: A 3 way dimmer switch lets you adjust lights from various spots.
Installation Differences Compared to Standard 3 Way Switches
Knowing how to install a 3 way dimmer switch is key. Unlike standard switches, dimmers often need an extra wire for power. This makes them easier to use with LED and CFL bulbs.
Wiring for dimmers is different too. Older switches use three screws for one common wire. Newer models might work with different bulbs and systems, making them more versatile in homes.
Troubleshooting Your 3 Way Switch
Dealing with a 3 way switch can uncover common electrical issues. Knowing how to spot these problems and fix them is key. It keeps your home lighting safe and efficient.
Common Problems and Solutions
Many face issues with 3 way switches in different parts of their homes. The usual problems include:
- No continuity: A faulty 3-way switch can break the circuit. This happens when there’s no connection between the common and traveler terminals.
- Intermittent switch functioning: Burned contacts can make switches work only sometimes. This makes finding the problem harder.
- Incorrect wiring: If the switches never worked, the wiring might be wrong. The black common wire should wrap around the traveler wires.
It’s wise to replace both switches if one is bad. This ensures the circuit works right. Getting help from a pro can make this easier.
When to Call a Professional
At times, you need a pro’s help. Call a professional electrician when:
- Trying to fix it yourself doesn’t work, and you’re getting frustrated.
- You’re not sure about the wiring or how the switch works.
- The fix involves complex setups like split outlets or many switches.
Professional help costs between $100 and $200 for a visit. They charge $50 to $130 an hour after that. Repair parts and materials can cost $85 to $200, depending on what’s needed.

Legrand Products for Your 3 Way Switch Needs
Upgrade your 3 way switch with Legrand products. They are known for being reliable and stylish. Legrand offers top-notch electrical solutions that boost both function and beauty in your home.
By using Legrand’s advanced switch technology, you get smooth lighting control. Plus, your home will look great.
Overview of Recommended Legrand Products
The Legrand Radiant® 3-Way Switch is a great choice. It works well for homes and businesses. Here are some key features:
| Feature | Details |
|---|---|
| Number of Switches | 1 |
| Contact Rating | 15 Amp, 120/125 VAC |
| Amperage | 15 A |
| Number of Poles | 3-Way, Single Pole |
| UPC Number | 785007245462 |
| Dimensions | Width: 1.43 in, Depth: 1.27 in, Height: 4.19 in |
| Customer Ratings | Rated 5 out of 5 stars |
| Warranty Type | 1-Year Limited Warranty |
| Wire Size | #14 – #10 AWG |
| Number of Gangs | 1 |
| Switch Type | Paddle |
Installing Legrand’s Innovative Solutions
Installing Legrand’s products is easy thanks to their simple design. First, check if the wiring fits, using #14 to #10 AWG wire. Follow the wiring diagrams closely for a smooth setup.
Always focus on safety and efficiency. Stick to the instructions in the manuals. Legrand products will not only work better but also add a modern look to your space.
Testing Your 3 Way Switch Setup
Checking if your 3 way switch works right is key. It makes sure the wiring is good and keeps you safe. By using the right electrical safety tips and doing detailed tests, you know your switch works well.
How to Properly Test Functionality
First, turn off the power at the circuit breaker. With the power off, you can safely check the switch. Use a non-contact voltage tester to make sure there’s no power before you start.
Here’s a quick guide:
- Check wire connections: Make sure all wires are tight and right.
- Examine switch terminals: Check each terminal against the wiring diagram.
- Power restoration: Turn the power back on at the circuit breaker.
- Functionality test: Turn the switch on and off from different places to see if it works.
Verifying Safety and Compliance
After you’ve checked if it works, make sure it meets local safety rules. The 2011 National Electrical Code says you need a neutral wire at switches. But, local rules might be different.
- Inspect for neutral wire: In newer homes, see if there’s a neutral wire in the switch boxes. This affects what lighting you can use.
- Test for consistent voltage: Use a multimeter to check the voltage at the switch. It should be safe.
- Consult professional advice: If you’re not sure about wiring or local codes, get help from a licensed electrician.
By following these steps, you make sure your 3 way switch is safe and works right. Always check for safety and function to avoid problems with your lights.
Maintenance Tips for Your 3 Way Switch
Keeping a 3 way switch working well needs regular care. This care helps spot problems early. Here, you’ll learn how to keep switches running smoothly and when it’s time for a new one.
Keeping Your Switches in Good Condition
It’s key to maintain your 3 way switch system. Start by checking the switch for any damage. This damage can mess with how it works. Here are some switch condition tips to keep your switches in top shape:
- Look for any wear or damage.
- Make sure all connections are tight and corrosion-free.
- Test circuit breakers to see if they’re working right.
- Use a non-contact electrical tester to check for voltage.
Signs Your Switch Needs Replacement
Spotting replacement signs early can stop bigger problems. Watch for these signs that mean it’s time for a new switch:
- Lights flicker or don’t turn on and off right.
- Swelling or scorch marks near the switch.
- Can’t turn lights on or off with either switch.
- Get high voltage readings at the switch.
| Sign | Action |
|---|---|
| Flickering lights | Check connections; replace switch if necessary. |
| Physical damage | Replace immediately to prevent hazards. |
| Non-responsive switches | Inspect wiring; if unsure, get an electrician. |
| High voltage readings | Fix electrical issues; might need a pro. |
By following these tips, you can make your home’s lights safer and more reliable. Being proactive helps avoid sudden failures.
Conclusion
The 3-way switch brings many benefits to your lighting control. It makes controlling lights easy with multiple points. It also meets different lighting needs, changing how we use our homes.
But, installing and keeping it in good shape is crucial. Knowing the right tools and wiring basics helps avoid mistakes. Regular checks and following safety rules keep your home safe and your devices working well.
Learning to manage your lighting is possible. Using a 3-way switch lets you control your space better. With the right setup and care, your home will fit your lifestyle perfectly.
Leave a Reply