Welcome to our guide on wiring a 3 way switch! This is perfect for homeowners or DIY fans wanting to improve their lighting. Learning about electrical switches is crucial for safety and function in your home.
We’ll talk about tools, step-by-step guides, safety tips, and mistakes to avoid. By the end, you’ll be ready to tackle your own 3 way switch projects. So, let’s begin!
Key Takeaways
- This guide covers the essentials of 3 way switch wiring, perfect for DIY enthusiasts.
- We’ll explore the tools and materials needed for a successful installation.
- Safety precautions are crucial before starting any electrical project.
- Common applications for 3-way switches will be discussed.
- We provide a step-by-step wiring guide to ensure your success.
- Learn to identify and avoid common wiring mistakes.
- We will recommend high-quality products to enhance your home’s electrical system.
Introduction to 3-Way Switch Wiring
Learning to wire a 3-way switch is key for those who want to improve their home with DIY projects. This switch lets you control one light from two spots, great for hallways or rooms with many doors. It’s all about making your home lighting better, safer, and more convenient.
A standard 3-way switch has three terminals: one common and two traveler ones. The common terminal is where power always goes. Knowing that the red wire of Romex goes to the common side helps a lot. This knowledge is crucial for anyone working on home electrical wiring.
When you’re wiring, it’s important to do it right. Start by loosely connecting everything before tightening. This helps you avoid mistakes. Also, when you connect the travelers to the switch, the order doesn’t matter as long as they’re not on the common terminal. This makes DIY electrical work easier and more fun.
Understanding the Basics of 3-Way Light Switches
A 3-way light switch controls a single light from two spots. It’s great for big areas like hallways or staircases. Knowing how to install one is key for DIY fans.
What is a 3-Way Light Switch?
A 3-way light switch has three screw terminals and a green grounding screw. It has two traveler screws and one common terminal screw. Unlike regular switches, it doesn’t have ON or OFF labels on the toggle.
Getting it wrong means the light only works from one spot.
Common Applications for 3-Way Switches
These switches are used in many ways. Here are some examples:
- Controlling hallway lights from both ends
- Operating lights at the top and bottom of staircases
- Managing outdoor lighting in entrance areas
They can also be part of a multiswitch circuit with 4-way switches. This setup lets you control lights in different ways. The installation uses different cables for each connection.
Tools and Materials Needed for Wiring
Before starting any wiring project, like electrical switches, having the right tools and materials is key. It makes the job easier and safer. Here’s what you need for wiring a 3-way switch.
Essential Tools for the Job
Here’s a list of tools you’ll need:
- Non-contact voltage tester: Makes sure power is off before you start.
- Utility knife: Helps in stripping wire insulation.
- Wire strippers: Important for stripping wire to the right length, about 3/4 inch.
- 4-in-1 screwdriver: Useful for different screws when installing the switch.
- Needle-nose pliers: Great for bending wires and making precise connections.
- Voltage tester: Checks that all power is off and helps with troubleshooting.
- Electrical tape: Keeps connections secure and adds insulation.
Required Materials for Wiring a 3-Way Switch
Make sure you have these materials for wiring a 3-way switch:
- Two 3-way switches: The main parts needed for the connection.
- 14-2 and 14-3 non-metallic-sheathed cables: For the electrical lines.
- Wire nuts: Usually come with new switches, crucial for safe wire connections.
- Electrical tape: Reinforces and secures connections.

Using high-quality materials is vital for a secure and lasting installation. Good materials help make smooth connections, following wiring diagrams for switches. Always refer to detailed wiring diagrams for a clear understanding of the layout and configuration needed for 3-way switch installation.
| Tool/Material | Purpose |
|---|---|
| Non-contact voltage tester | To confirm power is off before starting work |
| Utility knife | For stripping wire insulation |
| Wire strippers | To strip wires to 3/4 inch for proper connections |
| Screwdriver | To connect wires to switches using various types of screws |
| Electrical tape | To secure and insulate wire connections |
| Needle-nose pliers | For bending and hooking wires |
| 14-2 and 14-3 nonmetallic-sheathed cables | For running electrical connections |
| Wire nuts | To securely connect multiple wires |
How to Wire a 3 Way Switch
Wiring a 3-way switch might seem hard, but it’s doable with the right steps. It’s key to know the safety rules for electrical work to avoid accidents. This guide will help you with safety tips and a detailed wiring guide.
Safety Precautions Before Starting
Before you start, safety comes first. Following safety rules greatly lowers the risk of electrical dangers. Remember these important tips:
- Turn off the power at the circuit breaker to avoid shocks.
- Use a voltage tester to check wires are not live before working on them.
- Wear protective gear like gloves and safety glasses to protect yourself.
Step-by-Step Wiring Guide
Here’s a step-by-step wiring guide for installing a 3-way switch:
- Prepare the Wires: Cut 14/3 solid core wiring to the right length for in-wall use.
- Identify the Switches: Make sure both switches are 3-way, not 2-pole.
- Connect the Black Wire: Connect the black wire to the black contact on the switch.
- Connect the Red and White Wires: The red and white wires go to the brass contacts on grounded 3-way switches.
- Final Connections: Connect the white power main to the white light fixture wire. Attach the red wire to the red terminal and the white wire to the white power lines going to the 3-way switches.
When working with common wiring setups, remember that 66.67% of switches have a black, white, and red setup. Only 33.33% need a red, black, and white setup. Also, 50% of switches without a neutral wire can affect smart switch installations. Knowing these facts helps you with electrical projects. For more help, Home Depot offers free classes on installing three-way switches.
By following these steps and safety rules, you’ll have a better chance of wiring your 3-way switch right. Double-check your connections and test the installation before finishing. This ensures everything works as it should.
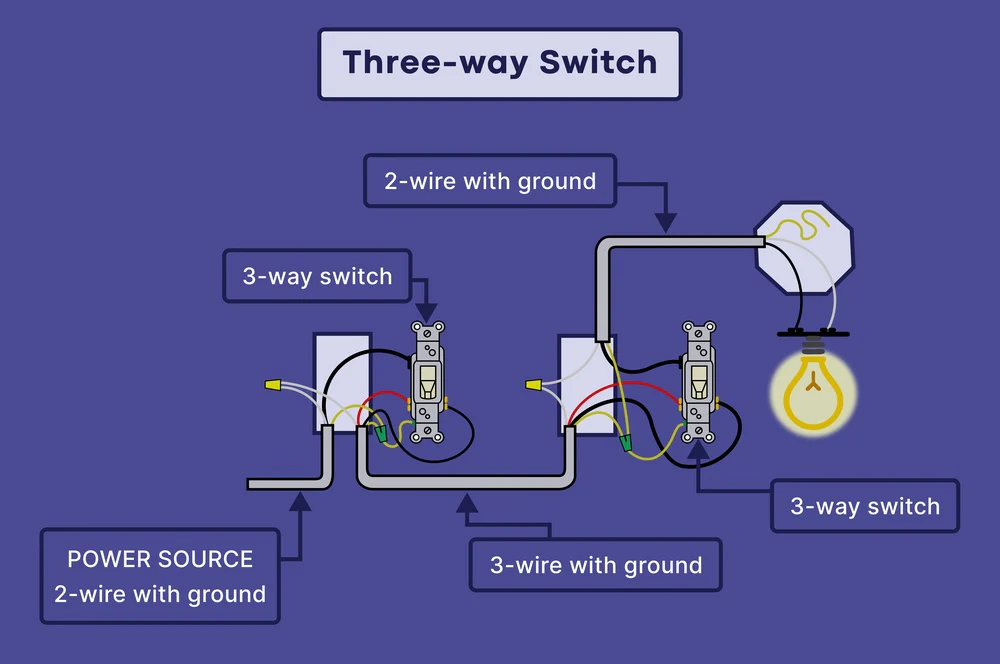
Wiring Diagrams for 3-Way Switches
Wiring diagrams are key for installing 3-way switches. They show the connections needed. This makes wiring easier, for both new setups and replacing old ones. With these diagrams, anyone can avoid mistakes and ensure the switches work right.
Understanding Wiring Diagrams
Wiring diagrams for switches are clear and detailed. They show how to connect wires for different setups. Knowing these diagrams helps figure out which wires go where. They also show the difference between standard and smart switches.
There are *at least eight ways to wire a 3-way switch*. Each method has its own variations, based on the brand. This is why using the right wiring diagrams is so important.
Example Wiring Diagram for Two 3-Way Switches
Here’s an example wiring diagram for two 3-way switches. It’s a useful guide that helps with the installation.
| Component | Description |
|---|---|
| Power Source | Supplies electricity; connected to the first switch. |
| First 3-Way Switch | Allows control of the light fixture from one location. |
| Traveler Wires | Connect both switches, allowing the light to be controlled from either. |
| Second 3-Way Switch | Facilitates control of the same light fixture from a different location. |
| Light Fixture | Final endpoint where the light is powered. |
By studying wiring diagrams, you can handle simple and complex lighting setups. Knowing these diagrams helps you wire correctly and safely, following all electrical codes.
Common Mistakes to Avoid When Wiring
Wiring a three-way switch can be tricky. Knowing common mistakes is key to a safe and working electrical system. Two big mistakes are getting the common wire wrong and the dangers of loose connections.
Incorrectly Identifying the Common Wire
Many people get the common wire wrong when wiring three-way switches. This wire is usually black and goes to a specific spot on the switch. If you get it wrong, the switches won’t work right. It’s important to check the wire color and make sure it’s connected right.
Double-checking the common wire’s spot and connection can stop problems later.
Loose Connections and Their Risks
Loose connections in wiring can cause big issues. They might make the three-way switch system work only sometimes or even stop working altogether. Loose connections can also lead to serious dangers, like fires.
It’s crucial to make sure each wire connection is tight and secure. Regular checks and the right installation methods can keep you safe from these dangers.

Testing Your 3-Way Switch Installation
After finishing your 3 way switch installation, it’s key to check if it works right. You need to follow a few steps to make sure your switches work well. We’ll go over what to do and how to fix problems if they come up.
Procedure for Testing Your Wiring
First, make sure you know which wires are which. Also, turn the power back on at the breaker. Here’s how to test your wiring:
- Start by using a non-contact voltage tester to see if power is on at both switches.
- Then, flip the first switch to see if the light comes on. Do the same with the second switch.
- If the light works with both switches, your wiring is set up right.
- If it doesn’t, check your connections again. Make sure you followed the wiring diagram correctly.
- Use a multimeter to check for wire continuity, focusing on the traveler wires and common terminals.
What to Do If It Doesn’t Work
If your test doesn’t show the expected results, don’t worry. There are ways to fix your wiring:
- Double-check that the right wires are connected to the right terminals. Make sure the line, load, neutral, and traveler wires match the color codes.
- Make sure all connections are tight. Loose wires can cause problems.
- If you think there’s a wiring issue, look for any unexpected live circuits in the switch box.
- Go back to the wiring diagram to check if your connections are correct.
- If you’re still unsure, think about getting help from a professional for tricky problems.
Upgrading Your Home with Legrand Products
Adding Legrand products to your home lighting can make a big difference. It improves both how things work and how they look. Switching to Legrand can change your space for the better, making it more convenient and easier to control.
Benefits of Choosing Legrand Switches
Legrand products are known for their smart design and strong performance. Homeowners get many benefits:
- Time Efficiency: Legrand’s latest products can save up to 85% of installation time. This means you can switch to modern solutions fast.
- Simplified Installation: You can install these products in just 15 minutes. They’re designed for people with basic tools.
- Seamless Integration: Legrand devices work well with your home’s wiring. They need only a neutral wire, common in homes built after 1985.
- Multi-location Control: Great for big spaces, Legrand switches let you control lights from different places. This makes access easy.
- Innovative Technology: Built on the Netatmo platform, these devices offer traditional 3-way control. They don’t need internet or complicated setup.
Recommended Legrand Products for Your Project
Here are some top Legrand products for upgrading your home’s electrical wiring:
| Product Name | Description | Key Features |
|---|---|---|
| Adorne Smart Switch | A smart switch that integrates with your home network providing remote control. | Time-saving setup, sleek design, neutral wire required. |
| Radiant Dimmer Switch | A dimmer switch for versatile lighting control, perfect for ambience. | Saves energy, easy installation, compatible with various bulbs. |
| 3-Way Wireless Switch Kit | A versatile kit allowing multiple switches to control one light. | Pre-paired devices, minimal wiring needed, battery-operated option available. |
Conclusion
This guide helps you learn how to wire a 3 way switch. It covers the basics, tools, and steps needed for a successful install. With two 3-way switches, you can control lights from different spots. This is great for hallways and staircases.
Knowing how to install electrical systems makes your home safer. It also lets you manage your space better. Follow the steps and use the diagrams to feel confident in your wiring projects. You might also want to check out Legrand for upgrading your home’s electrical.
Now you’re ready to wire a 3-way switch. This knowledge will make your home more efficient and beautiful. Enjoy the benefits of knowing how to install electrical systems.
FAQ
How do I know if I need a 3-way switch?
A 3-way switch is perfect for controlling one light from two spots. This is great for hallways or staircases.
What tools do I need for wiring a 3-way switch?
You’ll need a non-contact voltage tester, a utility knife, wire strippers, and a 4-in-1 screwdriver. These tools keep you safe and efficient.
Can I wire a 3-way switch without a diagram?
Yes, you can do it without a diagram. But, a wiring diagram is very helpful. It makes connections clear and avoids mistakes.
What materials are necessary for installing a 3-way switch?
You’ll need two 3-way switches, 14-2 and 14-3 cables, wire nuts, and electrical tape. These materials ensure a secure installation.
What safety precautions should I take when wiring?
Always turn off the power at the circuit breaker first. Use a voltage tester to check wires. Wear protective gear to stay safe.
How can I test if my 3-way switch installation is successful?
After making all connections, turn the power back on. Test the switches from both locations to see if they work right.
What should I do if the lights don’t work after installation?
If the lights don’t work, check your connections against the wiring diagram. Make sure the common wire is right and connections are tight.
Why should I consider using Legrand products for my switch installation?
Legrand switches are reliable and have innovative designs. They improve both function and look of your electrical system.
How can I identify the common wire in a 3-way switch?
The common wire is usually black or red. It connects to the dark terminal on the 3-way switch.
Leave a Reply